
This guide explains how to set up a MailChimp email newsletter and how to integrate it with a GV site that uses the standard GV theme. It is intended for project leads and Lingua site managers with admin privileges for a site.
If you aren't sure please contact the Lingua Manager or Technical Director and ask for help.
Contents
Creating a MailChimp List
MailChimp lets you run small email lists for free, so you can visit Mailchimp.com and create a list for your GV site.
You'll need to follow the various instructions from Mailchimp and make some decisions, but here are our guidelines:
- Choose a name that is simple and clear and preferably includes “Global Voices”, like “Global Voices en Français” or “Global Voices Books”.
- Make sure you Translate Signup Forms and Response Emails in for your list the MailChimp interface.
- Be sure to translate all aspects of the email and test its output before encouraging readers to subscribe.
- When in doubt use a Global Voices logo from our Logos & Badges page.
- Once you have everything set up, please contact the Lingua Manager so you can securely share the login details for the account with them.
Choosing/Designing a Template
The theming system inside Mailchimp is complex and powerful, but often things get worse rather than better the more you change. When in doubt it's best to choose a nice email theme and use its defaults.
The main thing to alter from default is the banner at the top (which affects all emails and forms, so it's worth setting up).
Sending an email (campaigns)
Once you have a list ready, you'll use the Campaigns tool to send email to it. Each “Campaign” is sent to a “list” and is based on a “template”, so you need both of those ready before you can send an email.
- Visit Campaigns in the Mailchimp admin.
- Choose the type of campaign (usually “Regular Campaign” or “RSS-Driven Campaign”)
- Choose your target list and click Next at the bottom.
- Fill in the Name your campaign field with a clear name like “Weekly Newsletter Jun 1, 2015″.
- Make sure the Email Subject is something accurate and interesting.
- Choose the template set up previously.
- Edit the email with whatever is customized for each one.
- Use the Preview and Test button at the top to preview how it will look (Enter preview mode) and send a test email.
- Check your email and make sure the test appears how you expect.
- Click Next at the bottom to go to “Confirm” screen.
- Look through the “feedback” (warnings) and click Send at the bottom when you are ready.
Testing a new list
Before setting up the subscription form on your site it's important to test the list and make sure everything is working as expected.
Review the public signup form
- We will use a custom form inside our WordPress site, but MailChimp has a publicly accessible form which subscribers will see if they click links in their emails for unsubscribing etc.
- Find the URL by going to Lists -> [your list] -> Sign up Forms -> General Forms and looking for the “Sign up Form URL” (usually at http://eepurl.com/xxxx)
- Make sure the form is accurate and translated.
- Try subscribing using the form and make sure the messages are appropriate.
- Add yourself and other members of your site to the list using Lists -> [your list] -> Add Subscribers.
- Create a new “Campaign” (email) and send it to your list.
- Check your email and make sure the newsletter arrives and contains what you expected.
Note on full Mailchimp Configuration
Configuring Mailchimp to have all the right information to meet GDPR and other privacy laws is complicated! Our full guide to doing this right lives in a Trello board where we track our lists. If you get to this point with a Mailchimp list, please contact the Tech Lead, or Lingua Manager for help in ensuring your list is compliant.
Configuring your MC list in WordPress
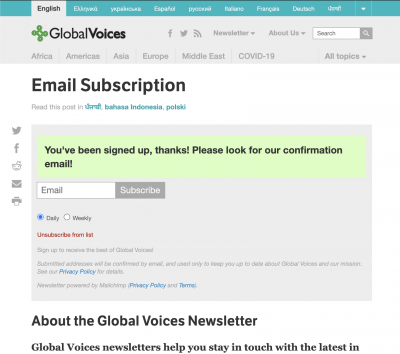
Example of an email subscription page, including the detailed consent information that was set up in the Mailchimp plugin settings.
On GV sites we use a MailChimp plugin to get simple integration of the signup form into the site header and the optional popup. There are two main steps to get it working correctly: Configure the Mailchimp plugin and create the subscription landing page that the form submits to.
MailChimp Plugin Setup
- In Plugins section of wp-admin enable the MailChimp plugin.
- Go to Settings > MailChimp Setup.
- Make sure you are already logged into the MailChimp account that has your list.
- Follow the Mailchimp instructions to get your API key from the Mailchimp site:
- Click your profile name to expand the Account Panel, and choose Account.
- Click the Extras drop-down menu and choose API keys.
- Copy an existing API key or click the Create A Key button.
- Back in Settings > MailChimp Setup paste your API key into the field and click Connect.
- Choose your list from the pulldown and click Update List.
- Header: This should be empty, remove anything there and use sub-header instead.
- Sub-header: A short message stating how the signup works and linking to our privacy policy and that of Mailchimp. Unless you have a good reason not to, just copy the text from the form embedded at the top of the GV Email Subscription page, as it has been carefully configured for maximum compliance with various privacy laws:
- Submit Button: Text for button i.e. “Subscribe”.
- Remove CSS: CHECKED! We want CSS (style) disabled because our theme has it's own styles.
- List Options – “MonkeyRewards”: Unchecked.
- List Options – “Use Javascript Support”: Unchecked.
- List Options – “Use Javascript Datepicker”: Unchecked.
- List Options – “Use Double Opt-In (Recommended)?”: CHECKED!
- List Options – “Update existing subscribers?”: Unchecked.
- List Options – “Include Unsubscribe Link”: Checked, we want this.
- Merge Variables Included: Untick any fields that are showing on the form, we only want to display “Email”.
Those are the essential settings for using the MailChimp plugin on a GV site. For more details or explanations please contact the technical team.
Subscription Landing Page
The subscription landing page is where users will be taken after they subscribe using the MailChimp form in the header, footer or popup. It also acts as a standalone place to subscribe or unsubscribe.
See the Global Voices in English Subscription page as an example.
IMPORTANT: This page is mandatory! The “Subscription” page is vital because it is where the forms in the header, footer, and popup send users after they enter their email. Without this page, the user won't know if they got subscribed or not.
- Add a new page in wp-admin > Pages > Add new.
- Use “Email Subscription” or a translation of that as its title (remember this page should make sense as both a place to subscribe and a place to confirm that subscription worked).
- As post content use our Mailchimp form shortcode, this will be replaced with the form and description from the Mailchimp plugin settings: [gv_mailchimp_form]
- Preview the page and make sure the form shows up correctly.
- Publish the page.
- Visit Settings > GV Settings and find the Special Pages table.
- Find Subscription Options in the table and choose your new page.
- Click Update all settings to save.
- Test that the newsletter form in the site header and footer work correctly by signing up a new email and making sure you see a success/failure message.
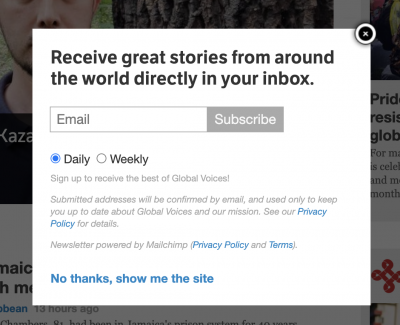
Example of a popup newsletter subscribe form with the text from the Mailchimp plugin settings as well as a catchy heading added in the WP Popup visual editor.
“WP Popup” is a plugin we have installed that can be used to create an overlay message that takes over the screen after someone visits the site. An effective use of this tool is to insert the Mailchimp subscribe form into the popup.
To set up a “popup subscribe form” please follow these steps precisely.
- Make sure SETTINGS > MailChimp SETUP is configured (as described above)
- In WP Admin > Plugins, enable the WP POPUP PLUGIN and WPP PREMIUM FUNCTIONALITY plugins
- Go to WP POPUP in admin sidebar
- Add New Popup
- If Blubrry Podcasting box shows hide it in Screen Options (it's annoying)
- Set the title to “Mailchimp Subscribe Popup” or something similarly descriptive, this title won't be shown to visitors.
- Scroll down to OPTIONS and change THEME to HTML THEME.
- In OPTIONS Set DELAY TIME to 1500
- In RULES section of OPTIONS tick “Hide on mobile devices”
- Also in RULES set COOKIE EXPIRATION TIME to 30 days
- Ensure the ENABLED switch at the top of OPTIONS is still set to NO.
- Click CREATE POPUP (save)
- In Visual editor create a heading text using HEADING 2 from “Paragraph” menu, insert catchy text that encourages people to join and makes sense with the default text you set up in the Mailchimp plugin settings, something like “Receive great stories from around the world directly in your inbox.”
- Insert the GV Mailchimp Form shortcode, which will show the form and description from the Mailchimp plugin settings:
- Add a link to close the box with class='closebutton':
<a class="wpp_closebutton" href="#">No thanks, show me the site</a> - In OPTIONS set ENABLED to YES.
- Click UPDATE POPUP (save).
- Visit the site homepage and test the popup.
Testing your popup
The trick to testing your popup is being a “fresh” user, because once you close it once there will be a cookie on your computer that stops it from showing again. Using a different browser, or a private/incognito browser window, gets around this issue.
- Open a new incognito/private browser window (to simulate fresh user)
- Load homepage and make sure popup shows and text is correct. Dismiss the popup with the link and make sure it works.
- Reload and dismiss by clicking outside the popup.
- Reload and submit a valid email address.
- Make sure it takes you to a page with the confirmation message.