

Global Voices and WordPress go back to 2005!
Welcome to the GV WordPress Posting Guide, a comprehensive documentation of the technical aspects of creating GV content on the network of GV WordPress sites.
If you're new, please see these important pages that introduce you to different aspects of GV:
If you are not a Global Voices contributor yet, please see the Get Involved page to learn how to become an author or translator.
Contents
WordPress Essentials
This section covers the basics of using WP and collaborating on posts across GV sites. If you are looking for something specific, please use the Table of Contents on the right to navigate.
Logging into WordPress
Most GV sites run on the wordpress.org (WP) web application, which we use to edit the posts and other content that make up the sites.
To edit a site, you need to log in using a special URL common to all WordPress sites: /wp-admin/.
If you add /wp-admin/ to the URL of any WP site and you should see a login form and related tools. For example, to log into the English GV website, you would go to: globalvoices.org/wp-admin/∂ƒ∂
If you are a contributor, you should already have an account in the appropriate GV WordPress site, if not, please speak to your editor or manager within GV, or visit the Get Involved page to join the community!
To learn about how WP users are created and managed on GV, please see WordPress User Management.
Recovering a lost password
If you don't have a password or have forgotten it, simply use the Lost your password? link and the site will email you a link to reset it.
Remember to make your passwords unique and complex (capital letters and symbols), and store them in a dedicated password manager application so you don't have to worry about remembering them!
Drafting and Publishing Posts
Most contributors in GV use WordPress to create Posts, either original stories, or translations. In both cases, creating a post is easy:
Adding a new post
- Log into WordPress through the
/wp-admin/URL. - In the sidebar on the left, click on Posts > New Post.
- Give the post a title, fill in the body text, and add other metadata as described later in this article, then save it as a Draft.
- When the post is ready for review, notify your editor or manager using Editorial Comments as described below.
- Once the post is finalized, an editor or manager Publishes the post, making it available to the public.
Note on translations: The Lingua translation system used by GV has many special properties, for more information please see the Translators’ Guide.
Posts in WordPress start off with the Draft status, which means the post is only visible to logged-in users in the /wp-admin/ section.
Saving Drafts
The content of your post inside WP will be autosaved on a regular basis, so ideally you should never lose your work. That said, it's still a good idea to press the Save Draft button regularly to ensure that your changes are properly recorded, and that other users will see the latest version of your work.
Previewing posts
One of the most important tools in WP is the Preview Changes button, found in the Publish box in the sidebar. This tool opens a new tab in your browser with a preview of how the post will look to visitors once it's published.
You should preview your work regularly and look for anything that's out of place, especially before publishing!
Revisions

Scroll down to the Revisions box on the post edit screen to see a history of who has edited the post.
Any time someone uses the Save Draft button on a draft, or the Update button on a published post, the changes are logged in the Revisions system of WP.
You can use this tool to see who worked on the post, and use the timestamp links for each edit to see exactly what was changed!
Publishing posts
When they are ready, posts are Published and become visible to the public on the site. Not all users are able to publish posts, so in many cases, you'll want to communicate with your editor or manager when you think it's time to hit the publish button.
Don't use the “Submit for Review” button
Most users don't have permission to publish their own stories, so instead of a Publish button, they see Submit for Review alongside Save Draft. Clicking Submit for Review sends a notification to users subscribed in the Notifications box (explained in the next section), but it isn't very reliable or predictable.
We strongly recommend avoiding the Submit for Review button, and just using the Save Draft button for saving, and the the Editorial Comments feature for sending notifications to other users.
Notifications and Editorial Comments
There are many situations where we need to communicate with other WP users about our posts, like when a post is ready to be published, and we send it to our editors or managers.
Luckily the GV WP sites have a system that makes this very easy to do from within the posts themselves, using the Notifications and Editorial Comments boxes inside the post editor.
Subscribing another user and sending them a notification with Editorial Comments
- While editing a post, scroll down to the Notifications box.
- Search for the user by name (e.g. your editor), then tick the box to subscribe them.
- This “subscribes” them to the post, meaning they will receive email notifications when the post's status changes or when someone adds an Editorial Comment.
- Keep an eye on their name and make sure the background flashes green, indicating that it saved correctly.
- You can see all users currently subscribed using the Selected tab of the Notifications box.
- Scroll to the Editorial Comments box, then type and submit your comment, which will be sent as an email to everyone subscribed in the Notifications box.
- As you write your comment, you will see the recipients listed, a good opportunity to confirm that everyone you expect to be there is listed.
- If someone is missing, return to the Notifications box and make sure they are ticked in the Selected tab. If there are issues, re-save the post and return to make sure the subscribers are correct.
Editorial Comments are a great way to indicate your post is ready, to ask questions, or otherwise discuss the progress of the post. They are especially powerful because the email notifications automatically include so much information about the post, like its status and URL.
These features are powered by the “Edit Flow” plugin for WordPress, and you can learn more about how to use them on the Edit Flow page of this site.
Visual and HTML Editing Modes
The main body text editor in WordPress has two tabs at the top right: Visual (what you see is what you get) mode, and Text (HTML).
Visual mode is usually more comfortable for writing, while the Text (HTML) mode is extremely useful when you need to figure out a tricky problem.
A useful trick to use when switching modes is to select the content you are working on before switching, the text or image you select will be still be highlighted, making it much easier to find especially when switching to Text (HTML) mode.
Important: All code in GV posts should work in both Visual and Text modes!
Some content, like HTML embed codes from other sites, will work in the Text (HTML) mode, but break when you switch to the Visual editor. Such content isn't allowed, because inevitably a translator or editor will edit that post using the Visual editor and it will break.
If you are ever unsure about some custom HTML, be sure to switch back and forth between Visual and Text (HTML) modes to make sure everything continues working.
Pasting from Google Docs etc.
Important: Use caution when pasting from Google Docs or Microsoft Word!
Text copy/pasted from rich text editors will often contain unwanted HTML formatting that isn't visible in the Visual editor, but causes problems later for editors and translators. It's important that posts on GV are “clean”, and free from pointless <span> and similar HTML tags, even those only visible in the Text (HTML) editor.
Whenever possible, use the WordPress editor to compose posts, as this will result in reliably clean HTML. That said, it is often not practical to do so, and Google Docs or similar apps are required.
In cases where you need to copy/paste from a rich text source, you can either use the Paste as text tool, which removes all formatting, or paste normally, then use the Clear formatting tool, which preserves structural elements like links and headings, but removes styles like bold and italic.
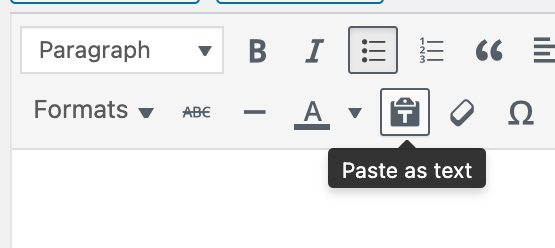
Click the Paste as text button before pasting to paste a clean version of what's in your clipboard, with all formatting removed.
Pasting without formatting from Google Docs or Microsoft Word
Whenever possible, use Paste as text button in the Visual editor to paste from external sources. It will remove all formatting, including the problematic extra HTML tags inserted by Google Docs etc.
- Click the Paste as text button in the toolbar first.
- Then paste normally, and only the plain text version of the content will be inserted.
- The same effect can be achieved using the Edit > Paste and Match Style (or similar) option from your browser.

Selecting text pasted from Google Docs, then using the Clear formatting button, will clean up unwanted HTML that is hidden. In this example the link would be preserved after cleanup, but the bold text would be reverted to standard.
Cleaning up HTML pasted from Google Docs or Microsoft Word
If you need to paste content while preserving formatting like links and headings, you can do a normal Edit > Paste as long as you use the Clear Formatting button in the Visual editor to clean it up after.
- Paste the text normally, preserving links and headings.
- Select the text you just pasted.
- Click the Clear Formatting icon in the toolbar, which looks like an eraser.
- Repeat this for every paragraph in your document that is pasted.
- Clear formatting will still remove styles like bold and italic, you'll have to add them back within WordPress after pasting.
Post Settings
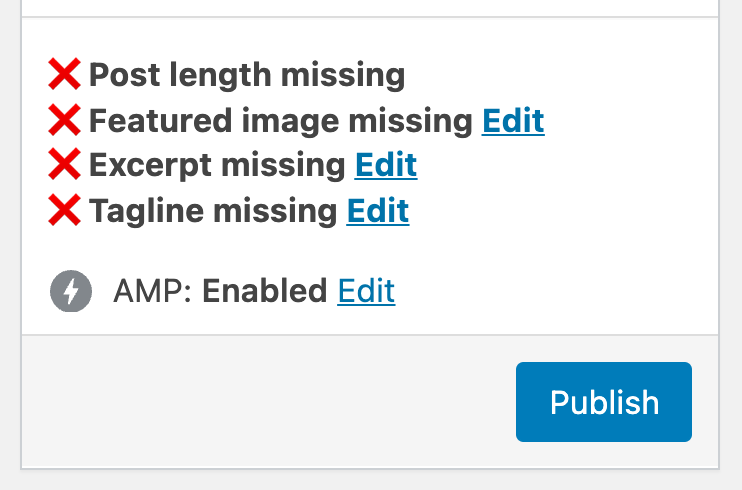
Keep an eye on the Publish checklist!
These are the core aspects of a post that need to be set up for every story.
While editing posts, keep an eye on the Publish box, which has a checklist of the most important post settings and their status. Never publish a post that's missing its Featured Image or Excerpt!
Excerpts
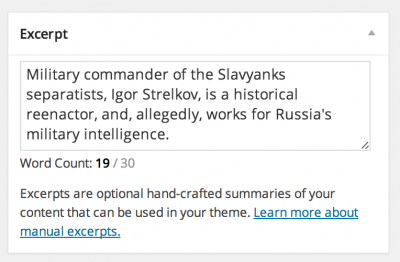
Example excerpt with word counter showing a safe length.
The post Excerpt is a summary of the post that appears in various places along with the title and featured image, like on the homepage, or when the post is shared on Facebook.
Excerpts are controlled with the Excerpt box on the post editing screen, which has a word counter to make sure the text is a safe length and doesn't get cut off when displayed.
To quickly jump to the Excerpt field, click the Edit button next to the excerpt validation in the Publish box in the sidebar.
If a post doesn't have an excerpt, one will automatically be created from the first words of a post, but the results are rarely interesting and often cut off mid-sentence.
For advice on how to write a compelling excerpt, please read Tips for Writing Tempting Excerpts.
Taglines

It's ok if the Tagline word-counter shows red, just try to keep it concise.
Taglines are simple lines of text that show below the post's title and above the rest of the content.
Taglines are added to posts using the Tagline field, which has a word counter to encourage you to keep it short and concise.
To quickly jump to the Tagline field, click the Edit button next to the tagline validation in the Publish box in the sidebar.
All posts should have a tagline. It is ok for taglines to have text in common with the Excerpt, because they are never shown together, but the Excerpt is generally longer.
Learn more: Taglines: What they are and how to use them
Featured Images
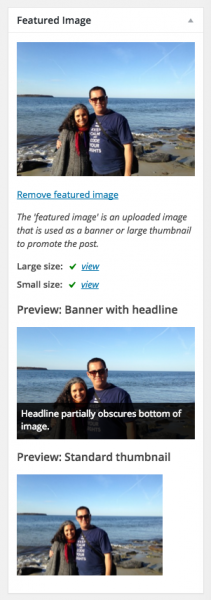
Featured image preview in the sidebar of the post editor.
Each post needs a Featured Image, a chosen upload that acts as the “thumbnail” for the post, and gets shown in various places and sizes when promoting the post, such as on the homepage and social media shares.
The Featured Image box in the post editor sidebar lets you select the image to be used for the post, and on GV it also shows you previews of how it will look.
Note that the Featured Image isn't automatically shown on the post itself! You should always also embed the image into the post body text, along with a caption that states the source and copyright of the image. See the Adding Images section below for general information on uploading and embedding images.
Choosing a featured image
- Find the Featured Image box in the right sidebar of the WordPress post editor.
- Click Set Featured Image to open the image uploader popup.
- Either use the Upload Files to upload a new image or go to the Media Library tab to see a list of photos already uploaded.
- Click the image you want and use the Set Featured Image button in the bottom right corner to save your choice.
- Once you've chosen an image the Featured Image box will display it along with previews of how it will look in different parts of the site.
Cropping featured images
The Featured Image is very important to promoting a story, so it's worth taking a moment to consider if it could be improved through cropping it to focus on only what's most important.
Featured images on GV are shown in a variety of aspect ratios (shapes), ranging from “widescreen” rectangles to squares, so ideally the main subject of the photo should be in the centre, both horizontally and vertically.
The easiest and safest way to crop images is to do so on your local computer, then upload the cropped image to WordPress for use as a Featured Image.
You can also crop images after upload inside WordPress using the Edit Original button, but please use caution: Cropping an image inside WordPress will affect all uses of that image, so if you have the same image embedded inside the post it will be cropped to! For this reason, we recommend first uploading a fresh copy of the image, then cropping it and using that copy for the Featured Image, leaving the original in place for use inside the post.
Categories
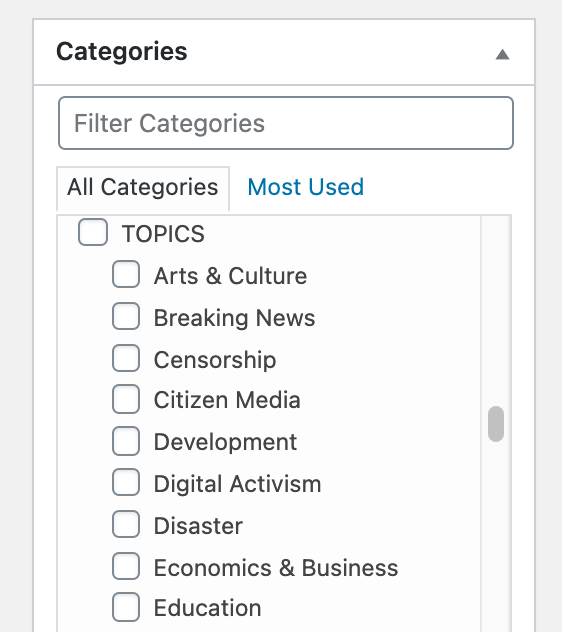
Scroll through the categories list and tick the ones that apply.
Categories in WordPress are “taxonomy terms”, used to organize posts into groups that help users find what they are interested in, like countries and topics.
Before publishing a post, use the Categories box to review all the options and tick the ones that apply to the post.
If you're looking for a specific category, start typing it into the Filter Categories search box to quickly narrow down the results.
On most GV sites the categories are organized into sections like countries, topics, and languages. See the information boxes below for an explanation of the main category types and when they should be added to posts.
Important: Authors and editors should never add new categories to the list. The category list on GV is carefully managed to avoid duplication and keep it as short as possible, as well as ensuring the categories match across translation sites.
If you think a category is missing, please contact the Technical Lead.
Region and country categories
GV has a set of country categories organized inside their region parents. Here are some quick guidelines for choosing the right countries and regions for a post:
- Tick all countries that are meaningfully discussed in the post.
- When you tick a country category always tick its parent region as well.
- If your post is about a region generally but not a specific country you don't have to choose a country.
- Never tick all the regions! Even if your post is about “the whole world”, don't tick every region, it's ok for posts to not have a region or country if they aren't about a specific place.
Topic Categories
Topic categories are straightforward themes like Politics, Culture, and Censorship.
- Select all the topic categories that are specifically relevant to your post.
- If you are unsure about the “meaning” of a topic category, visit its public archive screen and use the posts already tagged with the topic as a guide.
- When in doubt, don't tick topics unless you're sure they apply.
Language Categories
GV's Language categories indicate that a post contains quotes and references to citizen media in that language.
- Tick language categories when your post contains references to things happening in those languages.
- E.g. If a post was written in English but has translated Chinese quotes and links to a Spanish news story, the Chinese and Spanish language categories should be selected.
- Note that language categories are totally separate from country categories and the “main” language of a country. If a post about Tunisia has French quotes then use the “French” category, not “Arabic”.
Remember: The language the post is written in should not be checked as a category, only the languages of the external content being linked to.
Type Categories
The “Type” categories used to be important, but are no longer displayed on posts. There is only one important “Type” category: Featured.
- Featured posts are chosen by the managing editors, and are shown in the “Featured posts” lists at the top of archives. Authors should not use this category.
Permalink URL
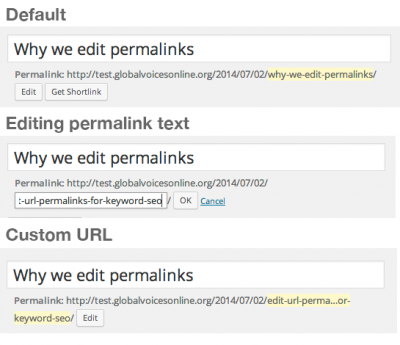
Steps to edit a permalink.
The “permalink” of a post is the unique text at the end of its URL. By default this is a URL-safe version of the post title, but it can also be customized.
Post URLs are very important for search engines like Google, because posts will rank higher for search terms that are present in the URL.
Usually you should leave the permalink alone, and focus on writing a title that is engaging and contains the keywords people are likely to search for, but there are some good reasons to customize a URL, such as to make it shorter, or to add keywords that people are likely to search for, but which don't fit in the title.
Editing a draft's permalink
- Once a draft is saved you'll see the Permalink listed along with an Edit button, just below the title.
- Click Edit, which shows a field with the default permalink where you can edit it.
- When you're done, click OK to close the field, then save your post immediately.
- Note that you should never leave empty spaces or special symbols in URLs, instead keep it to simple words separated by hyphens (
-).
WARNING: Never edit a permalink on a published post!
As soon as a post is published its URL is sent out to the internet in a variety of ways, notably through our RSS feed. Changing the permalink after publishing will make all those links lead to 404 errors, which is very bad!
If you ever absolutely need to change a permalink after publishing, make sure someone creates a “Redirection” so that the old URL points to the new one. Learn more in Redirecting URLs with Safe Redirect Manager.
Multiple Authors
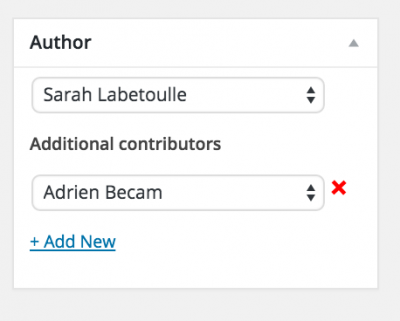
Author box in post editor showing a second contributor.
The Author box in the post editor controls who will be credited as the creator of the post. Initially, it uses whoever first creates the draft as the author.
Editors and site managers can use this field to make sure the correct user is set, though many contributors won't see it at all.
By default WordPress only supports a single creator for each post, but Global Voices has a special system that allows Additional contributors to be set. Anyone listed in the Additional Contributors will show in the credits and have the post listed on their profile page.
Deciding which contributors qualify as “co-authors” of a post is up to you, but setting them is easy.
Adding multiple authors to a post
- Find the Authors box in the sidebar of the post editor.
- Click the + Add New button to add a second pulldown menu with the list of authors.
- Choose the second author, repeat as necessary then save your post.
- Save the post to confirm your changes.
- To remove an additional contributor click the ❌ next to their name.
If you ever need to change the order of the authors, just remove all the Additional Contributors using the ❌ icon, then add each author back in the order you want them to appear.
How “Written by” and “Translated by” credits work
The Lingua translation system controls how credits are displayed based on the translation type of the post, Original or Translation:
- All the contributors listed in the Author box will be credited the same way, either as “Written by” or “Translated by”
- If the post is a Translation, then the contributors will show as “Translated by”
- If the post is an Original, then the contributors will be shown as “Written by”
- So if you want a user to be credited as “Written by”, you need to make sure they are in the Authors box on the Original post, and the opposite applies for translations.
For most authors and translators, this will never be a problem, but it can be a source of confusion when posts are being written and edited simultaneously in multiple languages. Please see the Decentralized Publishing guide for more information
Extra-wide layout
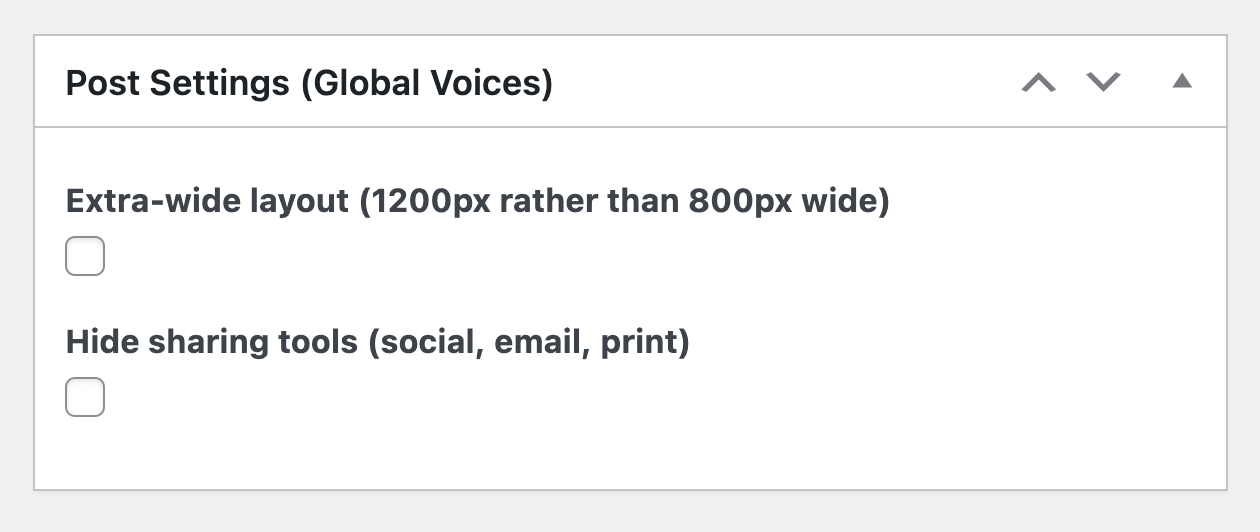
The “Extra-wide layout” setting in the Post Settings metabox.
Ticking this box will make the post content wider on desktop browsers. Instead of all content in the post being constrained to a comfortable reading width (about 800px wide), the post expands to the full width of the site's header and footer (about 1200px wide).
Most content inside the post like paragraphs and blockquotes will remain constrained to 800px, but images will be able to fill the larger width, either by having “huge” size images that are wider than paragraphs, or inserting “large” size images aligned left or right, in which case they “break out” of the paragraphs and take up the empty space to the left or right.

Example of a post using the “normal” and “Extra-wide” layouts (click to enlarge). Note that full-width images in the “Extra-wide” version have to be inserted as Huge size, and aligned image as Large size to render correctly in Extra-wide layout.
When creating posts with a wide layout, you can use the .full-width format (link to full documentation below) to mark individual paragraphs, headings, etc. as “full-width”, making them fill the space like a huge image would. This is useful for complex layouts where certain elements need to fill the space to match each other.
Learn more about Extra-wide layout and the .full-width format, including a video guide, in this blog post: Design Update: New in-editor preview of extra-wide posts and “full-width” format
Extra-wide layout can be used when you have one or more huge images that can take advantage of the extra space, or when you want to make use of many .factbox sidebars inside your post.
Extra-wide layout should not be used unless you have at least one huge image to insert at the start of the post. Without a large image to start, the layout looks terrible, and you are better off using the “normal” (80opx) layout.
For a demonstration of the Extra-wide layout, please read through GV Test Post: Formats and the Extra-wide version of the same article. That post explains our various formats, as well as how they are affected by the Extra-wide layout setting.
Remember mobile!
All posts on Global Voices are “responsive” and most readers will be reading from a mobile device. Keep this in mind when designing your article, and be careful with any content so “big” that it won't be legible on a small screen.
Rarely-used metadata
Geolocation
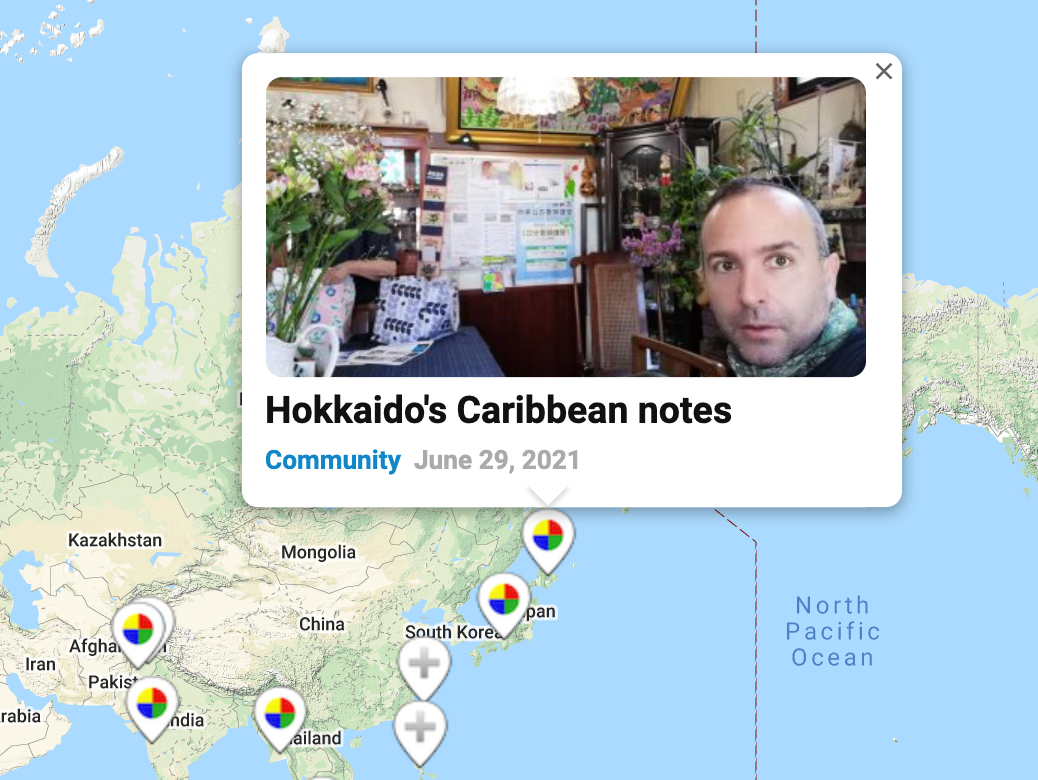
Example [gv_map] embed showing various posts based on their location.
This feature is optional and most posts are fine to ignore the Location box.
Learn more on Geolocation in WordPress.
Text Formatting
Below are the various text formats we use in our posts. In all cases, they can be added with both the Visual Editor (WYSIWYG) and the Text Editor (HTML). If you require formatting that isn't listed below, contact the Tech Lead for assistance.
Quotes
Blockquotes are a standard feature of HTML, and are used for any text taken directly from an external source that is more than a few words long:
<blockquote>Quoted text goes here.</blockquote>
Note that not all quotes require a blockquote tag. Some can be included in a post simply using quotation marks. Please see the Style Guide for more details.
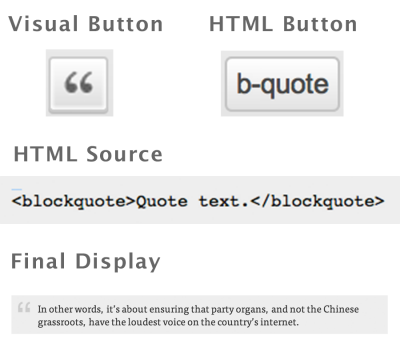
Blockquote reference
Visual editor
In the Visual editor you can use the Blockquote button (giant “ marks) to create blockquotes. If you have text selected when you push the button, the text will be wrapped in a <blockquote>, otherwise you'll toggle the current line into or out of a blockquote.
Tip: If you are editing a blockquote in the Visual editor and want to “get out” of it, hit Enter to create a new line inside the blockquote, then use the Blockquote button to disable the blockquote for the current line, which ends the quote on the line above and lets you do something else with the current line.
Text (HTML) editor
To automatically create a blockquote in the Text (HTML) editor, use the b-quote button. You can select text, then use the button to wrap it in a blockquote tag, or click the button to add the start and end tags individually.
Translation Quotes
GV has a special version of the <blockquote> tag specifically to mark a translation of another quote. We use them by adding a second <blockquote>, right after the original one, with a translation inside:
<blockquote>Original Text</blockquote>

<blockquote class="translation">Translated Text</blockquote>
This allows us to include the “Original Quote” in the post, in case the reader is able to read it themselves.
Translation Quote reference
Visual editor
In the Visual editor you can convert a line of text into a Translation Quote using the Formats menu:
- Put your cursor on the paragraph or blockquote you want to convert.
- Click the Formats menu in the toolbar.
- Choose .translation
- This will convert the currently selected paragraph or blockquote into a Translation Quote.
- You can use the same menu item to convert a Translation Quote back into a normal quote.
Tip: The .translation buttons work just like the quote button, see the Quotes section above for more details.
Text (HTML) editor
In the Text (HTML) editor you can use the .translation button to wrap the currently-selected text in a translation quote.
Right-to-Left Language Quotes
Some languages like Arabic, Farsi, and Hebrew are written from right-to-left, the opposite of languages like English. On the web, these languages require special formatting and are rendered wrongly if it's missing.
On GV sites, we use the custom .rtl class on Blockquotes that contain right-to-left languages, to ensure they work properly:
<blockquote class="rtl">بدأت تتوالى</blockquote>
Note that this applies to sites where the default language is left-to-right, like English. On a right-to-left GV site, like Arabic, the entire site has the right-to-left style, and the .rtl class isn't needed. Instead, on a right-to-left site it's the left-to-right quotes, those in English, French, etc. that instead require the matching .ltr class, as described below.
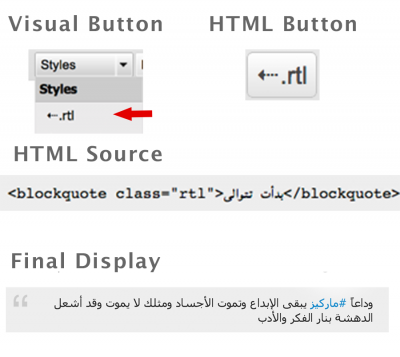
RTL Quote reference
Visual Editor
In the Visual editor you can convert a line of text to .rtl (right-to-left mode) using the Formats menu:
- Put your cursor on the paragraph or blockquote you want to convert.
- Click the Formats menu in the toolbar.
- Choose .rtl.
- This will convert the currently selected paragraph or blockquote into right-to-left format.
- You can use the same menu item to convert a line back into the default mode.
Text (HTML) Editor
In the Text (HTML) editor you can use the .rtl button to wrap the currently-selected text in a right-to-left blockquote.
Left-to-Right Language Quotes
The .ltr format is exactly the same as the .rtl format described above, but inverted. Use the .ltr format as described above when inserting a left-to-right language quote on a right-to-left language site.
For example, .ltr can be used on the GV in Arabic site (which is right-to-left by default) when translating a post from English, to ensure that English-language quotes are rendered correctly, rather than in right-to-left.
See the .rtl section immediately above for details on how to use the .ltr buttons in the Visual and Text (HTML) editors.
Full-width override
The .full-width format is special and only applies to posts using the Extra-wide layout setting to make them wider than normal posts. Inside an extra-wide post, .full-width can be used to make an element fill the horizontal space even when it wouldn't normally.
.full-width can be used on any HTML object in a post, but is intended for use with paragraphs and headings, for example when the first item in a full-width post is a paragraph, making it .full-width improves the design by having it match the title and metadata above.
Learn more about the .full-width format, including a video guide, in this blog post: Design Update: New in-editor preview of extra-wide posts and “full-width” format
Visual editor
In the Visual editor you can add the .full-width format paragraphs and headings:
- Select the text of the paragraph or heading you want to convert
- Click the Formats menu in the toolbar.
- Choose .full-width
- This will add
class='full-width'to it - You can use the same menu item again to remove the class.
Text (HTML) editor
In the Text (HTML) editor you can use the .translation button to wrap the currently-selected text in a translation quote.
Tip: See the video about this tool for more details and advice.
Pull Quotes
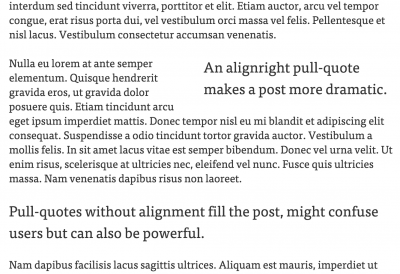
Example post with right-aligned and full-width pull-quotes.
Pull Quotes are a special format often used by magazines to emphasize a small excerpt of the article by “pulling” it out of the flow of the story and displaying it as large, dramatic text floating between paragraphs.
Pull quotes are usually aligned right or left so the rest of the story can wrap around them similar to how small floated images work.
<blockquote class='pull-quote alignright'>This is a right-floated blockquote</blockquote>
Visual Editor
In the Visual editor you can convert a line of text to a Pull Quote using the Formats menu:
- Put your cursor on the paragraph or blockquote you want to convert.
- Click the Formats menu in the toolbar.
- Choose one of the three pull quote options:
- .pull-quote full-width: Fill the width of the article
- .pull-quote alignright: Float right at 50% like an image
- .pull-quote alignleft: Float left at 50% like an image
- This will convert the currently selected paragraph or blockquote into the appropriate type of pull-quote.
- You can use the same menu item to convert a line back into a plain blockquote.
Text (HTML) Editor
In the Text (HTML) editor you can create pull-quotes manually by creating a Blockquote, then adding the .pull-quote class to it, as well as the alignright or alignleft classes if you want it to float. See the example above.
Factbox
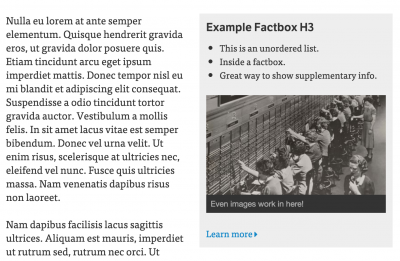
Example of a factbox floated right at the top of a post.
.factbox is a custom style used on GV sites that converts a part of the post into a grey box to distinguish it from the rest of the text. Text inside a .factbox is also slightly smaller, and uses a different font from the rest of a post.
Use .factbox when you want to highlight facts, trivia or anything else that doesn't fit in the normal prose of the story. For example we use them in this guide to distinguish step-by-step instructions from general explanations.
When a .factbox is aligned with .alignleft or .alignright it becomes a kind of sidebar inside the post, taking up half width and letting the rest of the text flow around it.
<div class='factbox alignright'>This is a right-floated .factbox</div>
Unlike some other formats, .factbox can contain other HTML types within it, such as lists (<ul> and <ol>), images and captions.
Visual Editor
In the Visual editor you can convert a line of text to a .factbox using the Formats menu:
- Put your cursor on the line you want to convert.
- Click the Formats menu in the toolbar.
- Choose one of the three .factbox options:
- .factbox (full-width): Fill the width of the article
- .factbox.alignright: Float right at 50% like an image
- .factbox.alignleft: Float left at 50% like an image
- This will convert the currently selected paragraph or blockquote into the appropriate type of .factbox.
- You can use the same menu item to convert a line back into the default mode.
Start with an empty .factbox: To avoid issues with converting existing content into a .factbox, start by converting an empty line into an empty .factbox, then add content inside of it like a blockquote.
Converting multiple lines: Converting a complex set of HTML (e.g. a heading, a list and an image all together) into a .factbox can be cause unexpected results, such as multiple boxes instead of one. For best results, create an empty .factbox on a new line, then cut and paste your content into it.
HTML Editor
In the Text (HTML) editor you can create a .factbox manually by creating a <div> tag, then adding the .factbox class to a <div> tag (as well as either .alignleft or .alignright to make it float). See the example above.
Contributors
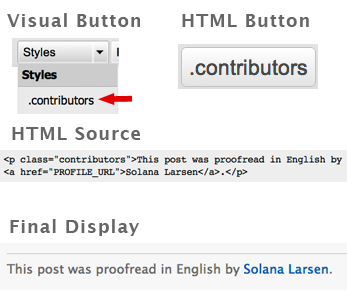
.contributors is a custom style used by GV to list extra contributors who worked on a post, but aren't credited using the main Author box.
Place the contributors paragraph at the very end of every post, where it will blend with the automatically-displayed credits that follow.
<p class="contributors">This post was proofread in English by <a href="https://globalvoices.org/author/solana-larsen/">Solana Larsen</a>.</p>
Whenever possible, link the name of the person to a sensible profile, such as the author profile page for GV authors.
Contributors reference
Visual Editor
In the Visual editor you can convert a line of text to a .contributors block using the Formats menu:
- Put your cursor on the paragraph or blockquote you want to convert.
- Click the Formats menu in the toolbar.
- Choose .contributors.
- This will convert the currently selected line.
- You can use the same menu item to convert a line back into the default mode.
HTML Editor
In the Text (HTML) editor you can use the .contributors button to wrap the currently-selected text in a contributors block.
Notes
Extra notes can be used at the end of posts to add necessary context or information for readers, as well as to give a special style to updates to the post added after publishing.
<div class="notes">text</div>
The display and functioning of the .notes class is exactly the same as the .contributors class outlined above. All instructions apply, just use the .notes buttons and/or CSS class in either the Visual or Text (HTML) editor.
Adding Images
Images are central to posts on Global Voices, and there are many details to consider when adding them. This section tries to document everything you need to know about inserting photos and graphics in your articles.
Copyright and attribution
Any images added to a post require a source credit and explanation of permission.
For more information on copyright and permissions for use, please refer to Multimedia Copyright and Attribution.
Graphic and violent content
If you want to include an image in a post that is graphic or violent, please be sure to review our obscene, offensive and graphic content guidelines.
Uploading and Inserting Images
To insert an image into a post, you first upload it from your computer into WordPress using the Add Media button in the post editor.
Uploading and inserting images into a post
- Ensure you have permission to use the image and prepare the attribution text (See Multimedia Copyright and Attribution for details)
- Find the largest version of the image available (ideally over 1600px wide).
- Download the file to your own computer.
- Rename the file so that its name is descriptive so that people searching for it later can find it, for example:
- Bad:
IMG003893.jpg - Good:
bangladesh-computer-lab-2022.jpg
- Bad:
- Upload the file to WordPress.
- Click the Add Media button above the post editor, then the “Upload Files” link in the popup.
- Fill in the image metadata fields (described below) with as much detail as possible, especially the Alt and Caption fields.
- Choose the alignment, link and size settings that fit your image.
- Use the Insert into Post button to add it to the post.
- The image will be inserted where the cursor was before you pushed the Add Media button.
Always upload fresh copies of images into WordPress!
Whether you are inserting an original image you created, or an image from the internet that you have permission to use, all graphics inserted into posts should first be freshly uploaded into WordPress. Never embed an image from another website using its URL!
Image Shapes, Sizes and Alignment
When you insert an image into a post, you need to choose a Size, which controls how big of an image file is used, and an Alignment, which controls whether it is full-width, or half-width and aligned left or right.

Choosing the size of an inserted image.
Image Sizes
On GV, every image uploaded to WordPress is converted and cropped into several formats, and you need to pick one each time you insert an image.
- Medium: 400px max width/height. Use this when aligning an image Left or Right.
- Large: 800px max width and 600px max height. Use this when inserting an image with Alignment None (full-width).
- Huge: 1200px max width and 900px max height. Use this when inserting a full-width image into a post with the Extra-wide layout (described above)
- Full size: The original size of the image. Only use this when there is no Large image. If Full size is bigger than Large, it can be very bad to insert it, since it will take forever to download.
- Large 16:9 featured image: This is a version of the image that has been cropped automatically to be 800px wide in 16:9 “widescreen” format. Normally these are used as metadata for things like sharing on Facebook, but you can also insert this version into posts if the 16:9 crop looks better than the Large size of this image.
- Huge 16:9 featured image: Similar to the previous version this is a “huge” 1200px wide image automatically cropped to be 16:9 format. Use this in posts with the Extra-wide layout.
- Custom Size: Define a custom width/height. Use this if for some reason you can't use Medium or Large.
Important: Please avoid inserting an image that's larger than needed for the space you're inserting it! Full-size images, in particular, can be enormous, and slow down the page dramatically, as well as wasting the mobile data limits of our readers.
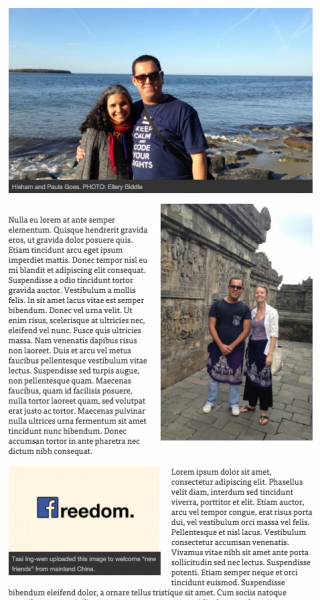
Demo post with a Large size image with alignment None, a Medium image aligned Right and another one aligned Left.
Image Alignments
- None: Show the image at full-width, and if it isn't big enough to fill the width, align it with the text above and below. Use Large size for normal posts, or Huge size for posts using the Extra-wide layout (described above)
- Left: Show the image at 50% of the post width, on the left. Use Medium size.
- Right: Show the image at 50% of the post width, on the right. Use Medium size.
- Center: Center an image in the column.
Here are guidelines for choosing how to embed an image depending on its shape and size:
Landscape Images (wider than tall):
- If a wide image is important, use Large size with no alignment (full post width).
- If there is no Large size, then use the Full size instead (it will be the biggest version available).
- If a wide image is small or poor quality, use Medium size and align Right or Left.
Portrait Images (taller than wide):
- Tall images should be inserted at Medium size and floated Right or Left to avoid them looking enormous.
- If you want to show a tall image at full width, consider cropping it to be square or wider.
Large images with intricate detail or text:
- Some images are too big to be inserted and viewed at full detail, even with Large size.
- In such cases, it's best to link to the Full size version and encourage people to click through to it.
- In the caption, along with the attribution text, write “Click to Enlarge”
- Set the Link to setting to Media File.
- This way users can click on the image to be taken to the full size, where they can zoom in on the details.
Super-tall infographic images:
- If a tall image must be more than 600px tall (i.e. an infographic where users are expected to scroll to see it all) then embed the Full size rather than Large.
- Before uploading such an image please resize it to 800px wide on your local computer, so that it will look good without being enormous and slow to download.
Image Settings
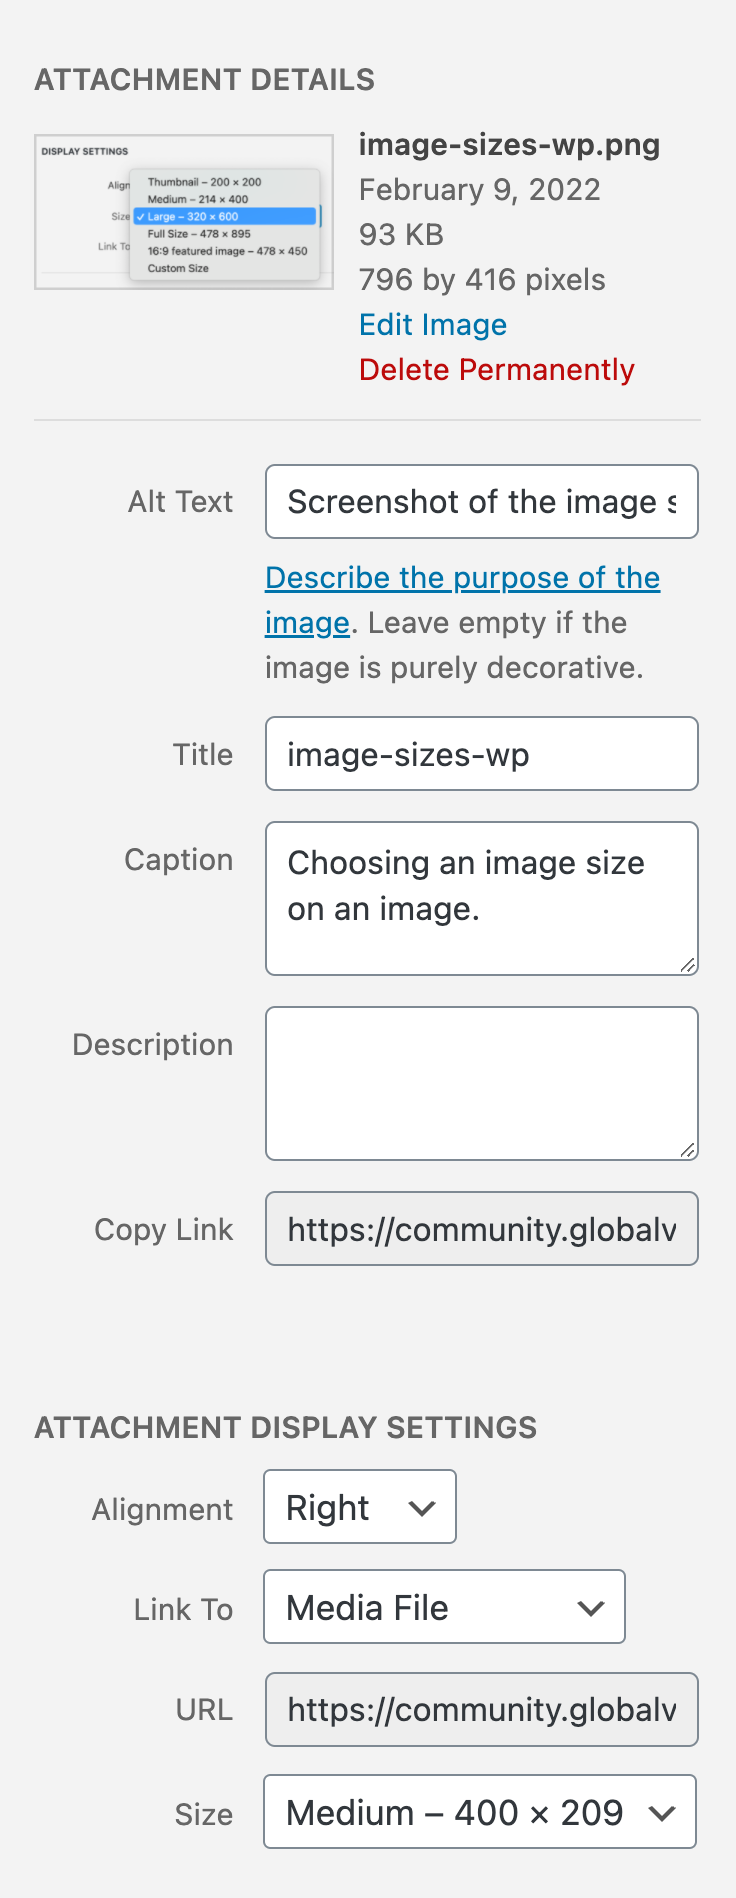
Example image settings for an image that will be shown at Medium size and aligned right.
For each image you upload, please look through all of the fields and settings before inserting it into a post.
Alt Text: MANDATORY! Explicitly describe the contents of the image. The alt tag is used by visually impaired people to know what is in the image, so please always fill this out and make sure it complements the caption rather than repeating it.
Title (optional): Short text identifying the photo. Not shown in the post.
Caption: Text that shows below the image. It should summarize the content briefly and attribute the author and source of the photo as well as indicate permission for use. Use HTML links (<a href=''>) in the Caption field to link to the source of images. See the Images section of the GV Writers’ Guide for more information.
Description (optional): A more detailed explanation of the photo, not used for anything by Global Voices, but this text can help future authors find your image by searching in the media library.
Alignment: Whether the image will float to the Left, Center, Right or None. See Image Shapes, Sizes and Alignment section above for full guidelines.
Link to: Where the visitor is taken when they click the photo.
- None: Don't link the image to anything.
- Custom URL: Use this whenever possible and link to the source of the image.
- Atachment Page: PLEASE NEVER USE THIS OPTION!
- Media File: Link to the full-size original image. Use this when the original is much bigger and contains important details.
Size: Whether to insert the Large, Medium or Full Size version of the image. See Image Shapes, Sizes and Alignment section above for full guidelines.
Tip: Always check how images look using the Preview button
Animated Gifs
Animated gifs have a few special considerations compared to JPG and PNG files. If a gif is not animated then there is nothing special to worry about, you can follow the instructions above.
Embedding animated gifs
- Use Full size: For the animation to show you must use the Full size version in the Size pulldown menu. The resized versions lose all animation.
- Some animated gifs are enormous (over 10MB) which means they will slow down the pageload and use up a lot of bandwidth for visitors.
- Please check the size of animated gifs and if they are over ~5MB consider embedding a resized (non-animated) version instead, then linking to the full animated version in the caption and on the image itself (set Link to to Media File).
Adding Videos
Videos can be a dynamic addition to a post, either as the subject of the story or for background information or flavor. We don't usually create original video at Global Voices and our site is not set up to actually host custom video. We do, however, encourage you to embed video from YouTube or similar sites when it is relevant to your story.
Always describe the video and link to its original source in addition to embedding it. Please see the Style Guide for more details. If you want to include a video in a post that is graphic or violent, please be sure to review the graphic content guidelines first.
Make sure embeds work in both the Visual and Text/HTML tabs of the editor. Some embeds may not work in the Visual editor because of its strict standards even though they work in the HTML editor. You should never depend on using only the HTML editor in these cases, and instead find another way to link to the content. See the Visual and HTML Editing Modes section for details.
Embedding YouTube Videos
Embedding a YouTube video is easy, but it's important you do it the right way. The HTML code you can copy on the YouTube site is very finicky and can break when viewed in the Visual editor and/or when it is imported for translation. To avoid this issue, you should always use the simplified WordPress embed system. See the WordPress Codex article about embeds for more.
The process is simple: Copy the URL of the video you want to embed and paste it into the post on its own line, like this:
Here is a video that illustrates my point:
[embed]https://www.youtube.com/watch?v=k0jNwMR9FiM[/embed]
There you have it.
This system is great because if the video or the embedding system ever break your visitors will still see the link to the video. It will still work if you skip the
[embed] and [/embed]
tags, but if the embed ever stops working those tags will help visitors understand what you expected them to see.
Embedding Other Kinds of Video
The YouTube embedding system is actually very general (based on a standard called oEmbed), and a lot of other kinds of videos can be embedded the same way.
The full list is very long and includes Vimeo, Flickr, DailyMotion and Viddler, among others.
If you try the
[embed]method and it doesn't work, then you can use whatever HTML the video site gives you for embedding, but please make sure that the embed code works well with both the HTML and Visual editors.
If the Embed Just Won't Work
If an embed does not work with both the HTML and Visual editors (or if it doesn't work with either) you can always take a screenshot of the video and embed it in the post instead. Hyperlink the screenshot to the video from its original source so that when people click they will be taken to the video.
That is a foolproof method when things get too complicated and is not likely to cause any problems during saving or translation.
Amara Subtitles

Screenshot of a video embedded through Amara and displaying French Subtitles.
Amara, formerly known as “Universal Subtitles”, is a service that lets you add subtitles to videos hosted on YouTube. GV sites have some support for embedding videos with Amara subtitles, so translators are free to use the service.
To embed the video (after transcribing and translating it on the Amara site), use the normal [embed] system, but with the unisubs attribute set to 1. For example (this Russian video has French subtitles available):
[embed unisubs="1"]http://www.youtube.com/watch?v=_pY7mOVbxN4[/embed]
Always link to the Amara-hosted version of the video
The main concern with embedding Amara videos this way is that in some cases, such as the AMP version of posts) they are rendered as plain YouTube, missing the Amara frame. This is better than being completely broken but could lead to reader confusion if the story assumes the subtitles are visible. So the rule to remember to always indicate in the article text that you expect the Amara subtitles to be there, and include a link directly to the Amara version of the video.
In the example above, the link to include is this one, where the video is shown with subtitles directly on Amara.org. By including the direct link, you enable readers to view the video with subtitles even if the embed isn't working for any reason.
Example warning text:
The video above should have French subtitles added the Amara service. If you don’t see the subtitles, please try watching the video directly on Amara.org.
Check out our Using Amara To Subtitle Videos guide to learn how to add subtitles to videos.
Adding Sound
Like video the method for embedding a sound file in a post with a player depends on the source of the audio file. For more, please watch the screencast How to embed an audio file into a Global Voices post by Georgia Popplewell, GV Managing Director.
Soundcloud
Embedding soundcloud files only requires the URL of the audio file and the
[embed] tag, similar to YouTube:
[embed]https://soundcloud.com/radioambulante/los-43-11[/embed]
The post will show a big player for the audio file.
Embedding an MP3
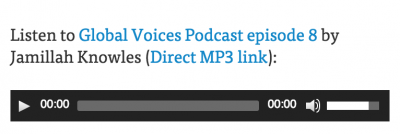
MP3 player with text to describe the audio and link to it's source.
Embedding an MP3 that's already on the web is easy. Our podcasting plugin “Powerpress” has a shortcode that will output a small player for your audio:
Note: This will only output the small player. You should always have text above or below the player explaining what the audio is, linking to the source website and with a direct “download” link for the file itself.
Note: Please don't upload audio files to the GV WordPress installation! Our server is not set up for audio hosting and it is very innefficient. Instead upload your audio to Archive.org as described below.
Archive.org
The recommended way to embed audio files on Global Voices is to first upload them to Archive.org, then insert that file in the post using the MP3 method described above.
Why we upload to Archive.org
Archive.org is a non-profit similar to GV but specializing in hosting Creative Commons media for free. Their site is specifically configured to host audio and video, so it's fast and reliable even though it costs nothing.
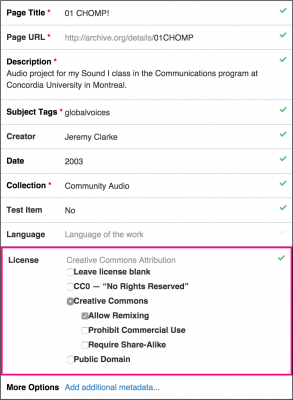
Upload metadata screen showing correct Creative Commons license.
Uploading a file to Archive.org
- Visit archive.org/create
- Create an account or log in.
- Use the Upload tool and choose your file.
- Fill out the metadata options to the best of your knowledge. Specifically
- Give your audio a Creative Commons Attribution-only license (CC-BY) in the Licensesection by choosing “Creative Commons” then checking the box for “Allow remixing” (this matches the license used on GV posts).
- In Subject Tags add ‘globalvoices’ and any other tags that make sense.
- When it finishes uploading you'll see the media page for your item.
- Find the Download Options listed in the right-hand sidebar.
- Copy the url for “VBR MP3″ by right-clicking it and choosing “Copy Link Address” (or equivalent in your browser).
Inserting the file in a post Once you have the link copied, embed it in your post with [powerpress url=] as described above.
Note about archive.org URLs: There is a quirk in the Archive.org system where the URL you copy from the link is not the same as the one you arrive at when you click it, because you are redirected to a special optimized URL at that point. Please always use the original URL copied from the link (like https://archive.org/download/…) rather than the optimized one (which looks like https://ia902600.us.archive.org/…..)
PRI.org
We embed audio players from Public Radio International as part of a partnership with them.
Currently the best format for the embed (iframe) code is as follows, which is the default embed code they give with style='width:100%;added.
<iframe frameborder="0" src="https://www.pri.org/node/80307/embedded" height="75" width="320" style='width:100%;'></iframe>
Of course you would replace the URL with the URL for a particular piece of audio.
Note: There may be issues loading the PRI embed over HTTPS, so please ensure there is always a link to another site where the player is working.
Adding Social Media
Quoting and embedding social media from around the world is a big part of many Global Voices stories. Below are guidelines for the technical aspects of including content from various services.
In all situations, be mindful of other people's expectations of privacy in their online postings. Don't quote or embed postings that are private and consider the safety of the original author before quoting from any service. For editorial guidelines, please see the Commentary section of the Style Guide.
Embedding tweets from Twitter.com
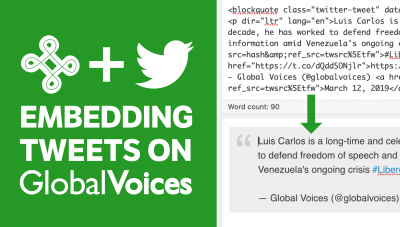
Watch a short screencast explaining how we embed tweets and why!
The official GV method of embedding Tweets in WordPress is using the Embed HTML from Twitter:
- Find the tweet on Twitter.com
- Hover over the tweet and click the “•••more” button.
- Choose “Embed” and copy the Embed HTML that pops up.
- In the WordPress editor, click on the “Text” tab and find the place where the tweet will go in the HTML.
- Paste in the HTML from Twitter.
This procedure results in a<blockquote class="twitter-tweet"> with the full tweet text as well as links, credit and timestamp.
By copying the embed code directly, we get a full copy of the tweet right in our post. When the post is viewed by readers, it will look fancier, with images, buttons etc, but behind that is a full backup of the tweet that will always be there, even if the tweet is deleted or Twitter itself goes offline.
For editorial guidelines on using tweets in a post, please refer to the Style Guide.
Note: Do not embed the Tweet URL directly!
Another way of embedding tweets from twitter is to copy the URL and paste it directly into a post, which is admittedly very easy and convenient. The problem is that embedding this way means that the actual tweet is not in our post, and if the tweet is deleted, the post will just show the URL, which will lead to a 404 error if clicked!
For the purposes of GV, this is not a worthwhile tradeoff, so rather than embedding URL's directly, we always use the method described above to get the embed code with the <blockquote class="twitter-tweet">.
To test if a tweet embed is URL-based or blockquote-based: When you're editing a post, both types of embed look very similar. To tell the difference, check if you can click inside the tweet and select text. If you can only click on the whole tweet (and see a blue box surrounding it) that is a URL embed, and needs to be replaced with the full Embed HTML as described above. If you can select and edit the text inside, then it is a proper embed!
Manually creating a tweet quote
If you're unable to use the official Twitter Embed HTML, but you know the content of the tweet, then you can create a new <blockquote> like you would for any other quote. In the case of a manually-created Twitter quote, you should ensure that it has the following elements inside:
- The @name of the Twitter user linking to their profile.
- The full text of the tweet, including any links.
- If there are other @mentions in the tweet, link them to the relevant Twitter user.
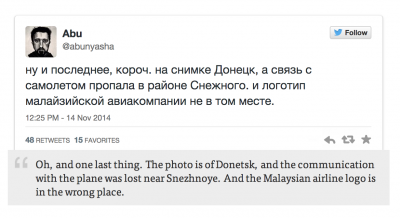
Never insert a screenshot of a tweet into a posts
A screenshot of a tweet can seem like a simple solution, but has several flaws that make it unacceptable, including that they are not readable by visually impaired people and are hard for translators to manage. Please never use screenshots when quoting from Twitter or any other site where a proper embed code is available.
Translating tweets
A tweet embed with translation blockquote
When the tweet isn't in the same language as your post, simply include a translation blockquote (<blockquote class='translation'>) after the tweet embed code (<blockquote>).
See the #Translation_Quotes section of this document for details and tips for using them.
- Only translate the content of the tweet itself. The links, date and username will already be visible inside the original tweet embed.
- Never translate the tweet embed code. Add a new translation blockquote for the translated text.
- Do not translate hashtags.
- If you need to add an editors note into your translation (e.g. to explain an abbreviation), wrap it in square brackets ([…]).
It isn't recommended to rely on embedded Facebook posts because they are volatile and often cause problems, but if you need to embed something from facebook, please use the following format:
[embed]https://www.facebook.com/globalvoicesonline/posts/10158467681898876[/embed]
Do not copy and paste the HTML embed code from facebook.com! It is important to use the [embed] format as above to ensure compatibility with the different ways GV articles are displayed. Using the raw HTML causes the embed to break in many scenarios.
For editorial guidelines on using Facebook content in a post, please refer to the Style Guide.
Images and videos from the Instagram sharing service can be embedded using the [embed] code with the URL of a particular item (like many other embed types). For example:
[embed]https://www.instagram.com/p/Buq8vU6Hcxn/[/embed]

Instagram embed with and without hidecaption="1"
By default the embed shows the image, its text caption, the like button and the comment button. It's possible to hide the caption by adding hidecaption=”1″ into your[embed] shortcode:
[embed hidecaption="1" ]https://instagram.com/p/trxJ5qQS07[/embed]
This will cause the text and like/comments buttons to be hidden, so only the image, username and instagram icon are displayed.
Getting the URL of an Instagram post can be tricky, but it's fast and easy once you know how:
- On the page for a single image, just copy the URL and insert it in a post as shown above.
- On a user's page you'll see a grid of images. When you click on one a modal popup will load and the URL of your address bar will change to be the URL for only that image. Copy it and insert it in your post as shown above.
- On your homepage (list of full images with text) you can get the URL for an image by clicking the timestamp/date. Copy the URL of the resulting screen.
As with all embeds you should always have an explanation of why this post is important that includes a direct link to it in case the embed one day breaks.
Embedding an Instagram “feed” rather than single post: It's possible to embed a “feed” from Instagram, which basically means showing the most recent post, whatever it is, rather than a single post. This is not recommended inside normal GV stories, but you can learn about the [gv_instagram_feed] shortcode on the WordPress Shortcodes documentation.
Mastodon Embeds
Mastodon posts can be embedded in WordPress is using the Embed code from the Mastodon post:
- Find the post on its Mastodon site.
- Click the
...button on the post - Choose “Embed” and copy the HTML code.
- In the WordPress editor, click on the “Text” tab and find the place where the embed will go in the HTML.
- Paste in the HTML from Mastodon.
- Preview your post to confirm it looks and works as expected.
Tiktok Embeds
Tiktok posts can be embedded via. their public URL using the [embed] shortcode, similar to Facebook and Instagram described above:
[embed]https://www.tiktok.com/@adventureul/video/7132868287498685701[/embed]
WordPress Embeds
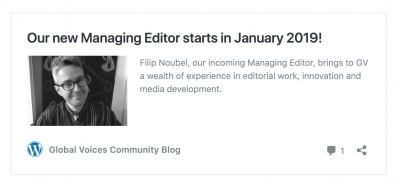
Example of a WP post embed created by putting the post URL on it's own line. USE WITH CAUTION!
All WordPress websites (including Global Voices sites) have the ability to embed posts, similar to how Twitter and Facebook work. This happens automatically in the WordPress Visual Editor when you paste the URL of another WordPress post onto its own line and hit enter. What you get is an automatic block that shows the title, and icon and some buttons.
These embeds are very convenient, but should be used with caution. They can confuse translators and it is much faster/more performant to use a normal HTML link in the post, rather than having an embed just for text and an image.
Translating WordPress Post Embeds
If you are translating a post with an embed like this one please follow the same instructions as given for Tweet embeds as described above. To summarize: Add a .translation blockquote right below the embed and translate the important text (title and excerpt of the post).
NOTE: We will be improving the design of these in the future, and may revisit the recommendation against using them.
Embeds to Avoid
The embeds below don't work properly with the GV WordPress setup in one way or another, so they should be avoided until further notice.
Examples of these embeds along with more information about the problems they have, should be available on the Social Media Embeds That Don't Work page.
Telegram Embeds
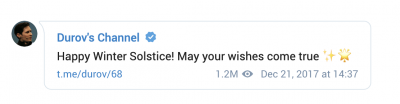
Example of an embedded Telegram post.
Telegram is best known as a chat app, but posts can be made public, and when they are, they can be shared and embedded in WordPress like a Tweet. See the Telegram Post Widget documentation for more information.
On first glance, Telegram embeds work on Global Voices WordPress sites. Telegram will give you some Javascript code similar to the following:
<script async src="https://telegram.org/js/telegram-widget.js?7" data-telegram-post="telegram/83" data-width="100%"></script>
You can place this code inside a GV post using the Text view of the post editor. It will look strange in the editor, but when you preview the post, it should look normal.
AVOID TELEGRAM EMBEDS BECAUSE: While they work in normal post views, they are completely broken in the AMP versions of our stories, and thus they will be invisible to mobile users who find our stories in Google. Maybe in the future AMP will add support for Telegram embeds, but as of February 2020, there are no hits in Google for anyone even trying to solve this problem.
For the time being please use a regular <blockquote to quote from a Telegram embed.
Another note: Currently the Telegram embed's output is hard to apply styles to, so if you have a .translation blockquote immediately following the embed it will look normal with a space in between, unlike Twitter where they are stuck together.
Storify Embeds
Storify is a social media aggregation tool we sometimes use to quickly assemble stories from Twitter and Facebook. We only use it in breaking news situations where the increased speed is vital.
AVOID STORIFY EMBEDS BECAUSE: “Storified” posts can not be translated directly because Storify stores the tweets in a locked-up format on their server. In order to translate a Storify embed, the entire story has to be re-created using the WordPress editor and Twitter embeds, which takes a lot of work.
For the time being, please just use regular Twitter embeds in the WordPress editor rather than using Storify.